Ever struggled to get your customers’ designs perfectly aligned within your product’s print area or faced difficulties in setting print pricing? As a Shopify merchant, custom print area control isn’t just a nice-to-have; it’s the key to ensuring print accuracy, maintaining design consistency, and avoiding print production pricing errors.
Whether you sell custom mugs, t-shirts, or phone cases, having precise control over printable zones helps you to deliver what your customers see on-screen. Before choosing the best product customizer app, it is essential to know which platform offers flexible and robust custom print area features.
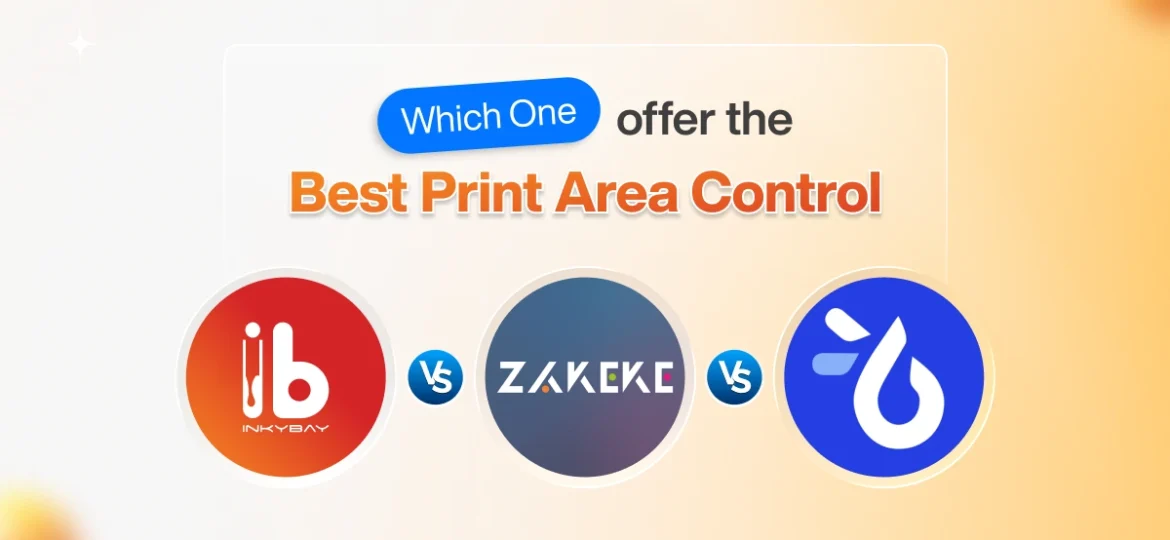
In this comparison of InkyBay vs. Zakeke vs. Teeinblue, we’ll showcase a side-by-side comparison table, key print area features, pros & cons, so that you can choose the best product customizer app with advanced print area features that fulfill your business and production needs.
InkyBay vs. Zakeke vs. Teeinblue: Quick Overview
Before we get into the details, let’s take a quick look to understand how these three Shopify product personalizer apps differ.
InkyBay
InkyBay is an all-in-one web-based Shopify product personalizer & customizer Shopify app for custom product-selling businesses. Its advanced customization features, easy-to-use interface, and flexible printing area control make this app a must-have among merchants. You don’t need to worry about dynamic pricing or inventory management.
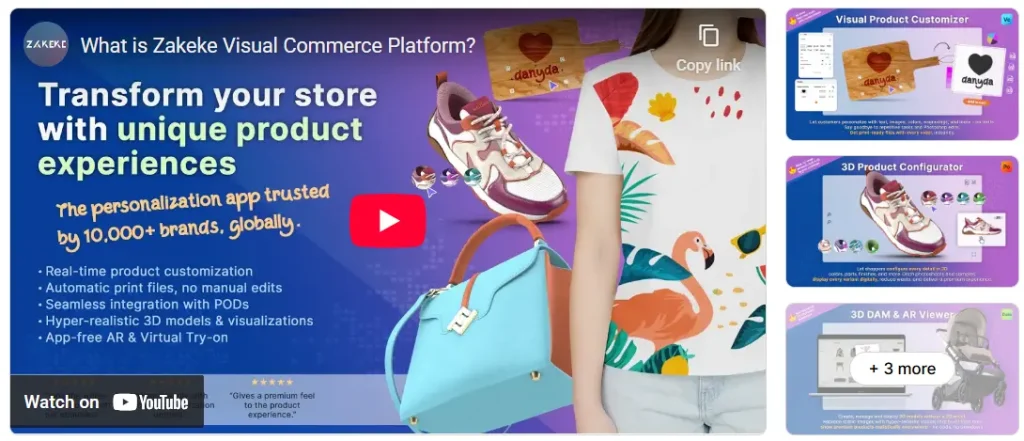
Zakeke
Zakeke is an AI-powered visual commerce platform that enables e-commerce businesses to offer real-time product customization, 3D visualization, and an AR visual try-on experience for their customers. It helps businesses to generate print-ready files and manage personalized orders, and many other features that streamline their online businesses.
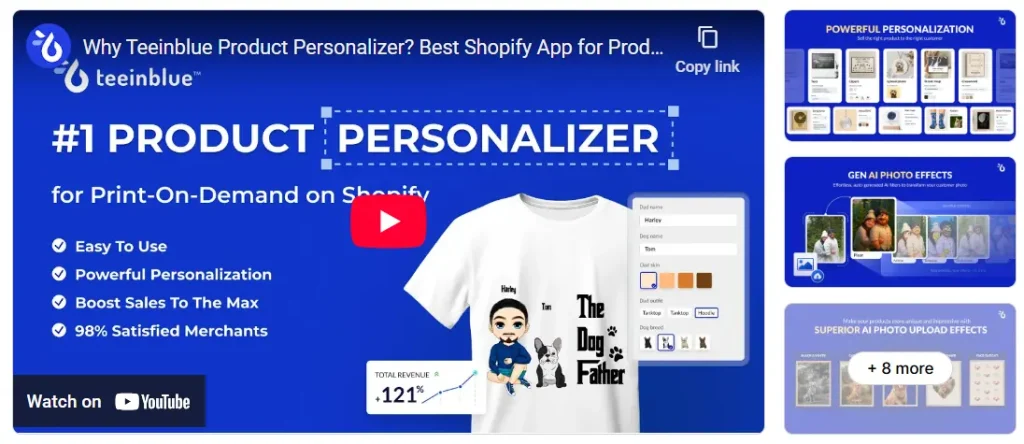
Teeinblue
Teeinblue is another popular app for e-commerce stores that personalizes POD products by allowing customers to create their own designs in real-time. Its print area is easy to use and offers you more flexibility.
To provide a more transparent comparison of custom print area control, let’s go through some essential print area features below:
| Criterium | InkyBay – Product Personalizer & Customizer | Zakeke – 3D & AR Customizer | Teeinblue – POD Personalizer |
| Print areas flexibility | Support unlimited print locations and multi-part/panel products | Only Back & Front print areas per product. | Basic (Front & Back) or single wrap areas per product. |
| Measurement units & dimension control | Support custom shapes, DPI controls, and flexible sizing (inch/cm/px) | Support only (cm/in) | Support only (cm/in) |
| Custom shapes/ masks/ bleed & cut lines | Yes – supports irregular shapes (i.e., star, rectangular, etc.) & multi-part products (front, back, sleeves, etc. | Yes – supports PNG masks, PDF with bleed/cut lines | Supports mask import (via PSD Smart Objects) for custom shapes |
| Print-ready files | Print-ready vector files (SVG, PDF, PNG, JPG) per order | Generates print-ready files for every print area (PDF/PNG/SVG, etc.) | Auto-generate print-ready files for orders (PDF/PNG, vector where applicable) and integrates with POD fulfillment |
| Printing types | Screen print, DTG print, Premium Vinyl, Flex print, Sublimation, and other printing types | DTG, sublimation, engraving, embroidery, etc | Focused on POD printing workflows (DTG, sublimation, etc.) |
| Pricing by printing color & size range | Yes – the merchant can set pricing on printing color & size range | Partial; not full control over color & size range | Partial; not full control over color & size range |
How does InkyBay fit your business?
InkyBay’s custom print area control is best for diverse e-commerce businesses and custom print shops that desire flexible print area setup, per-size scaling, print-ready files, quantity pricing, inventory management, and overall smooth printing area control. No production errors or setup complexity; easy to customize products and high-resolution print files.
How does Zakeke fit your business?
Zakeke’s 3D/AR experience and multi-surface custom print area control, best for businesses, requires a 3D configurator to showcase high-end or uniquely shaped products.
How does Teeinblue fit your business?
On the contrary, Teeinblue’s custom print control is best for print-on-demand (POD) sellers using providers like Printify, Gelato, or CustomCat who want a quick setup and automated file sync for production.
Now, let’s take a closer look at how each software print area actually works in real life with InkyBay.
InkyBay’s Flexible Print Area Features
As we’ve mentioned earlier, InkyBay is an all-in-one product customization software that allows merchants to define and set their own custom print areas for different products.
Key details of InkyBay’s print area setup:
- Customizable shapes: Store owners can define print areas in different shapes (rectangular, circular, custom polygons, etc.) to match the product’s form.
- Multiple print panels: Sellers can set up multiple print locations/panels (i.e., front, back, left sleeve, etc.) for a single product. The print part/panel depends on the product types.
- Print-ready file generation: You get high-resolution print-ready files, i.e., PDF, SVG, PNG, and JPG, that match the on-screen design and streamline the production process for the merchant.
- Multiple printing types: There are six different printing types available: screen print, DTG print, premium vinyl, flex print, and sublimation.
- High-resolution print quality: You can set a required minimum DPI for raster images uploaded by customers. The default is 150 DPI, but you can adjust up to 300 DPI for professional-grade printing quality.
- Design warnings: Warn customers if their design goes outside the defined print area or if an uploaded image is too low-resolution for the print size.
- Area-based pricing: Custom pricing rules can be set up based on the print area (i.e., per square inch/cm).
- Bleed and cut areas: Specific bleed or cut areas can be included within the print setup to provide essential guides for the production process, i.e., signs, stickers, etc.
Want to explore more about InkyBay’s custom shape print area? Check out the next section now!
1. InkyBay’s Custom Shape Print Area
If you sell products that require a custom shape print area, like a star, circular, or any other shape as a print area, you can select from “Print Area” options or upload a custom print area by following the steps below:
- Hover over the option “Products” from the top bar and select “Create a Custom Product.”
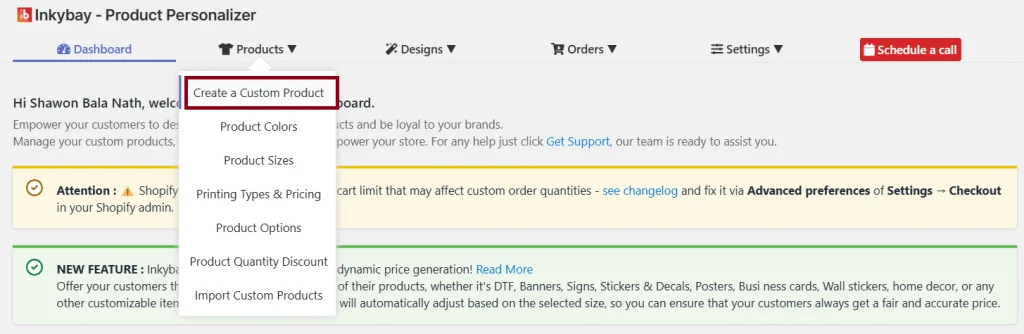
- Now, select the product you want to create a custom print area for and click the “Make it Customizable” or “Edit” option.

- Scroll down & select the option “Advanced Settings.”
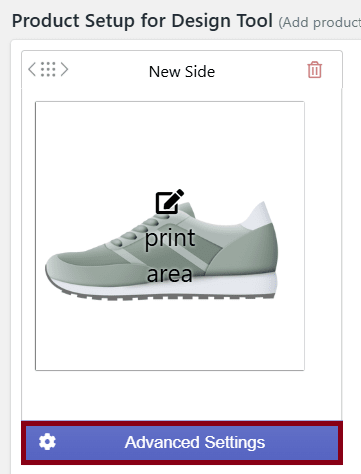
- Select “Print Ares” and click on the “Change/Upload” button, just as shown in the image below, to upload your custom print area shape.
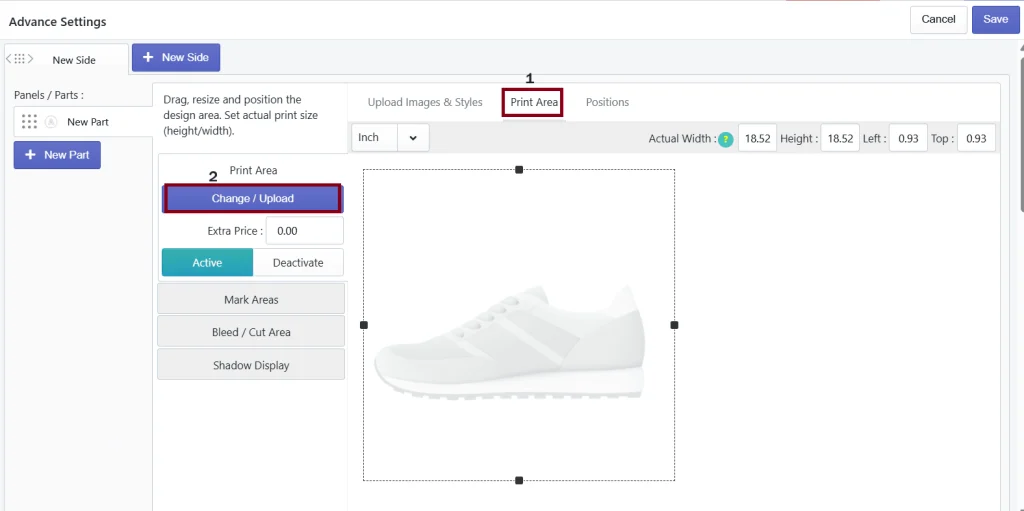
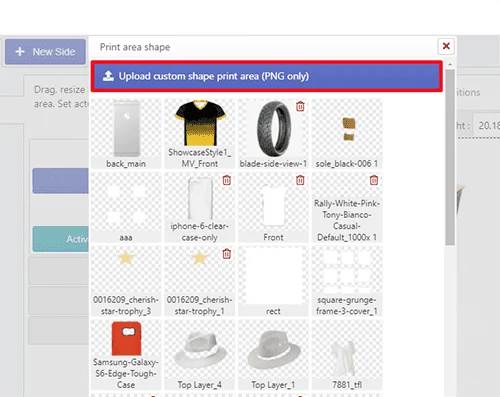
- After that, upload your custom shape print area as a transparent PNG image (keep the transparency for the part that you do not want to show) that you’ve created using any photo editor (Adobe Photoshop is recommended).
- Now, adjust your uploaded custom shape print area over your product back image and click the “Save” button.
If you go to the designer page and add any graphics/text, those will be inside the custom shape print area. Check out the help video and upload a custom print area today!
2. InkyBay printing types & Pricing
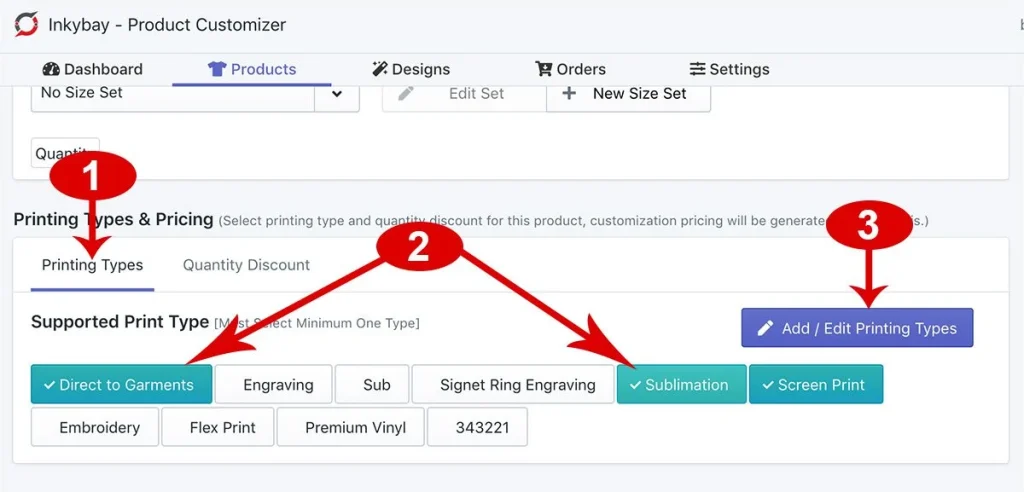
In InkyBay, the product customization pricing strategies are generated based on your selected printing types. Also, you get the flexibility to manage printing types, colors, and pricing.
[Note: If you don’t want to charge an extra price, set all the prices to zero (“0”) under the selected printing type for the product.]
For more in-depth details about InkyBay’s printing types, colors, and pricing details, go through the next section!
Printing types:
InkyBay supports five different printing methods, including Screen print, DTG print, Premium Vinyl, Flex print, and Sublimination. However, you’ve the flexibility to add multiple printing types on a single product to fulfill customer needs. If you want to add a new one, you can create one based on your product needs.
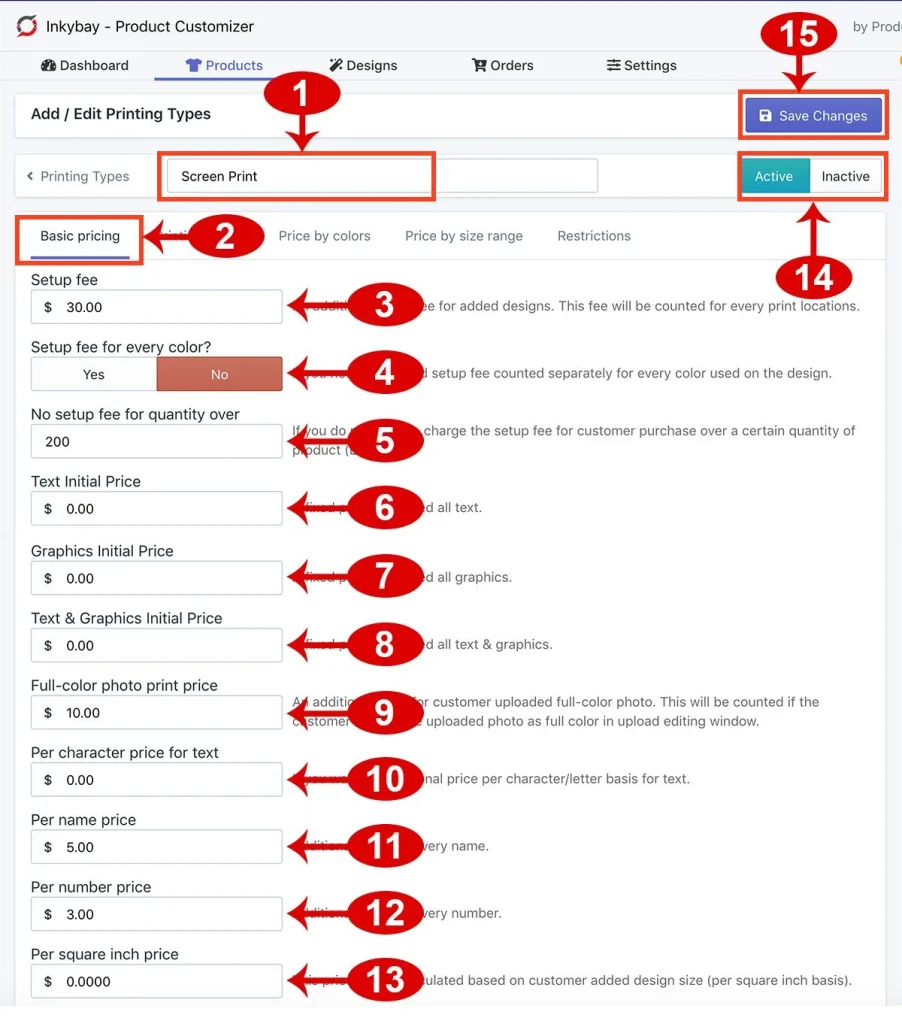
Basic pricing:
Do you want to add a setup fee for the entire design? You can do it under basic pricing: the initial price for text and graphics, color, number pricing, per square inch price, and more can be added into designs, just as the image shown below:
Printing colors:
Using the InkyBay app, you’ll set up your available imprint colors for the customer-added text and graphics. Also, you’ve the flexibility to manage printing colors based on the printing type, as shown in the image below!
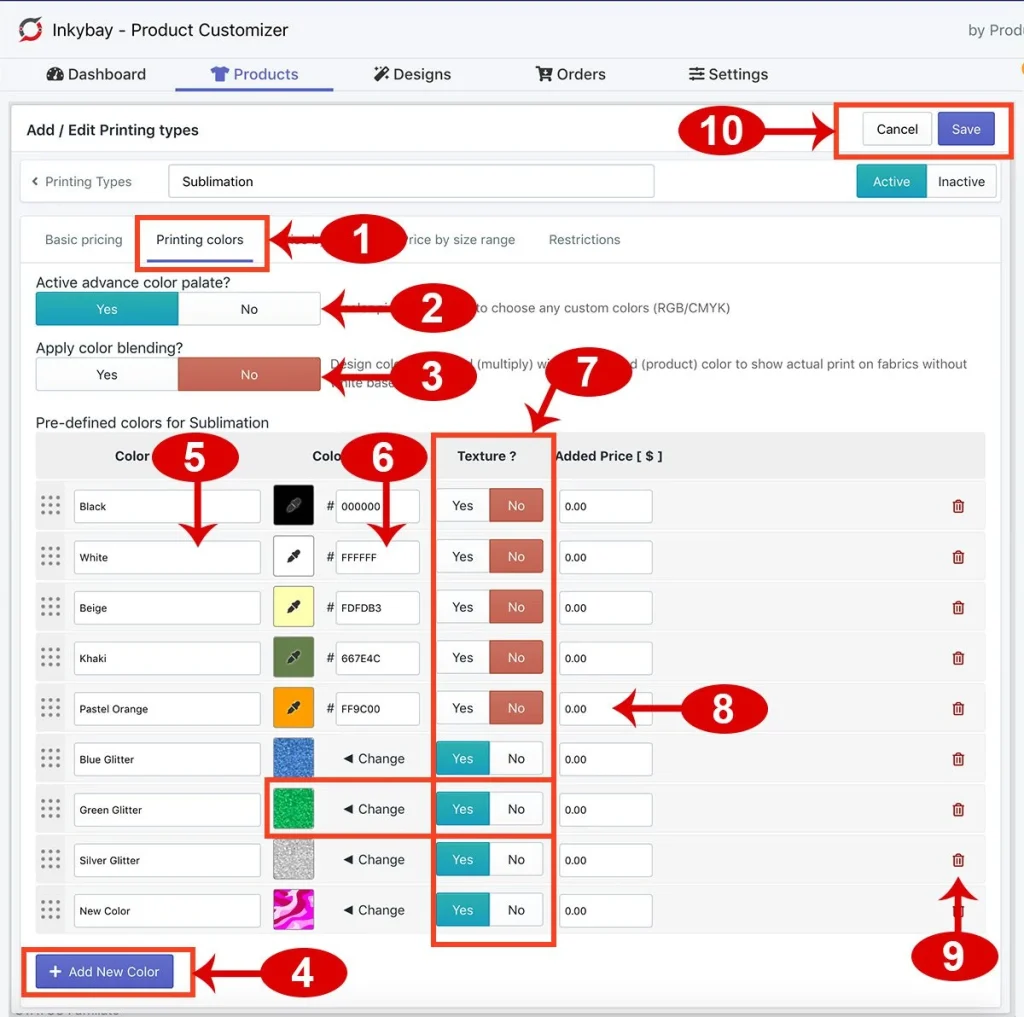
Not only that, you can set a price based on the print colors used for the customer-added designs. The best part is that you can combine the print colors and product quantity pricing and offer discounts.
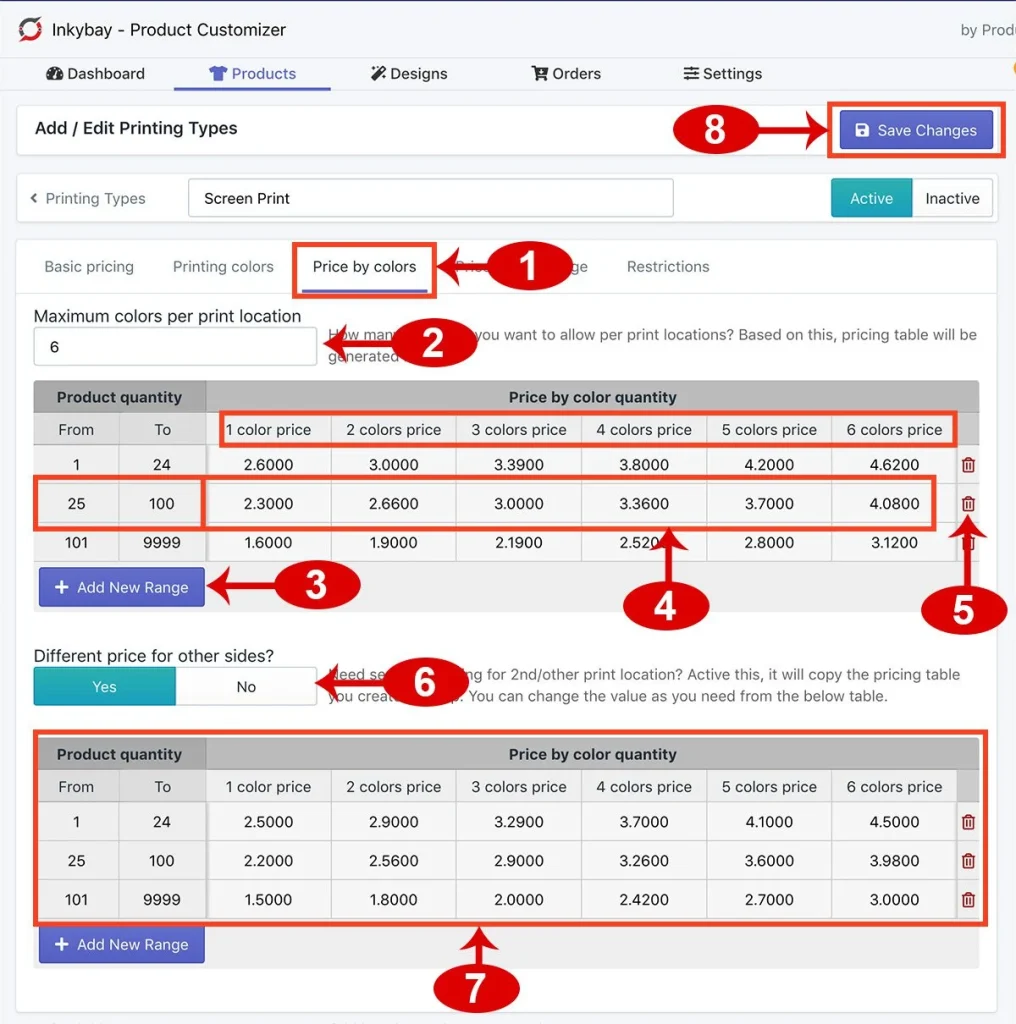
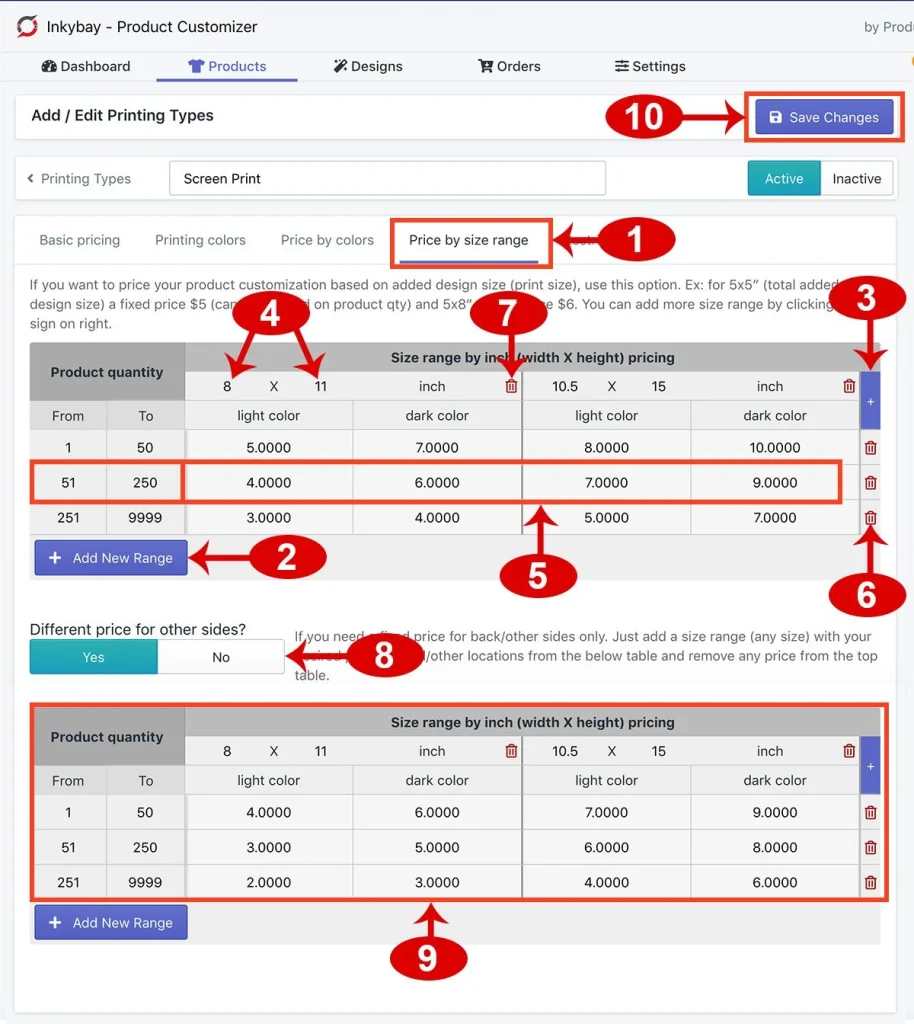
Price by size range:
If you want to set custom pricing based on the customer’s added design (total size range, product quantity range, and product color type), you can do it effectively. For example,
- Product quantity [1-45] & Print size [8×11″]; you can set the price $5 (for light color t-shirt) and $7 (for dark color t-shirt) as shown in the image below.
Restrictions
You’ll have to set the minimum product quantity based on selected printing types and the auto image filter (only for advanced and professional plan users) to make uploaded raster images a single color. Other printing type restrictions are as follows:
- Must enter the minimum product quantity (if you’ve any for a printing type or product).
- You can set a specific 6-digit HEX code to be applied automatically to all uploaded raster images for a printing type. (Note: Applicable when you want a fixed color code to colorize the uploaded image)
- You can restrict uploads by applying a default color filter only when you want to handle a single color.
| Note: For more details, check out InkyBay’s help docs or click the video link where you explore the step-by-step process on how to set printing types & pricing. |
3. InkyBay’s Limit/Restrict Cliparts based on printing type
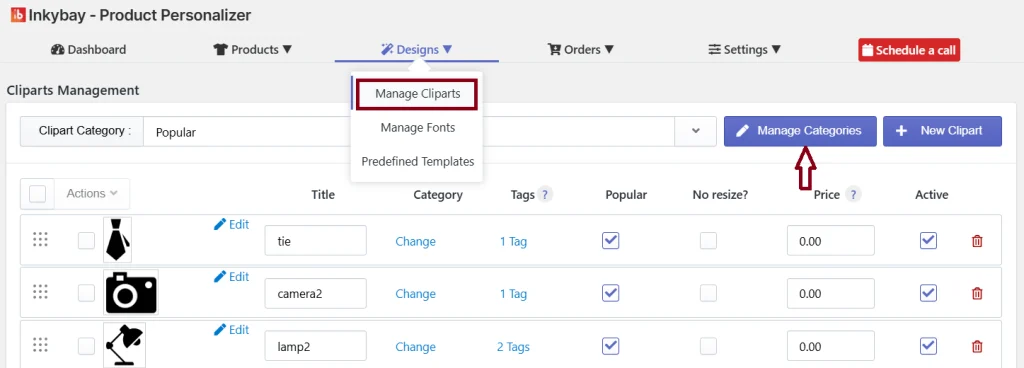
Do you want to restrict clipart categories based on the printing types, like embroidery? If yes, you can do it easily by following the given instructions:
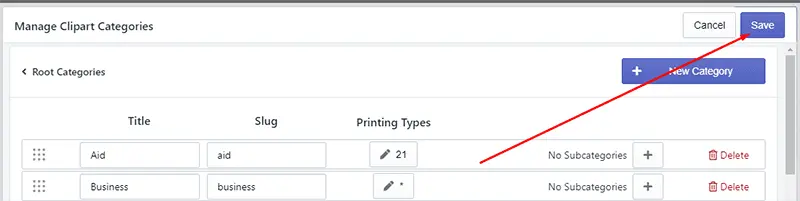
- Access your InkyBay app admin, hover on “Designs” and select the “Manage Cliparts” option.
- After that, click on the “Manage Categories” just shown in the image below.
- Click on the pen symbolized button on your preferred clipart category (which you want to restrict based on the printing type).
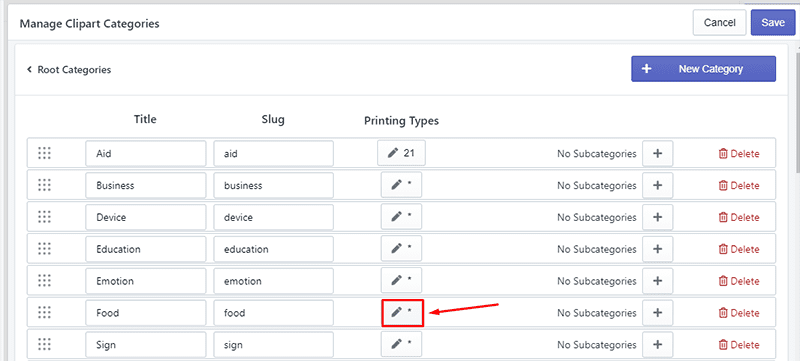
- Now, select the print types you want to allow and unselect the print types you want to restrict. Click the “Save” button.
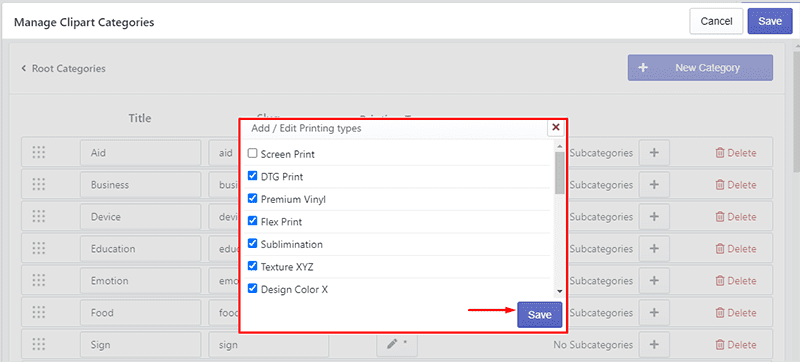
Note: If you don’t select any printing type (*), it’ll work for all printing types.
- After that, click the “Save” button to update the Manage Clipart Categories changes.
Now, the clipart category will work based on your selected printing types. Click the video link for more details.
Zakeke’s Flexible Print Area Features
Zakeke’s print area control allows you to define exactly where customers can place their designs, set rules for how those designs are generated for production, and automate the print-ready files. Here are some key features:
Print-ready files:
With Zakeke, you can generate high-resolution, print-ready files (PDF, PNG, SVG, and DXF) based on the customer’s design and the defined print area settings. Also, you can activate “special outputs” depending on the production needs, including BMP and PDF-Layers (OCG).
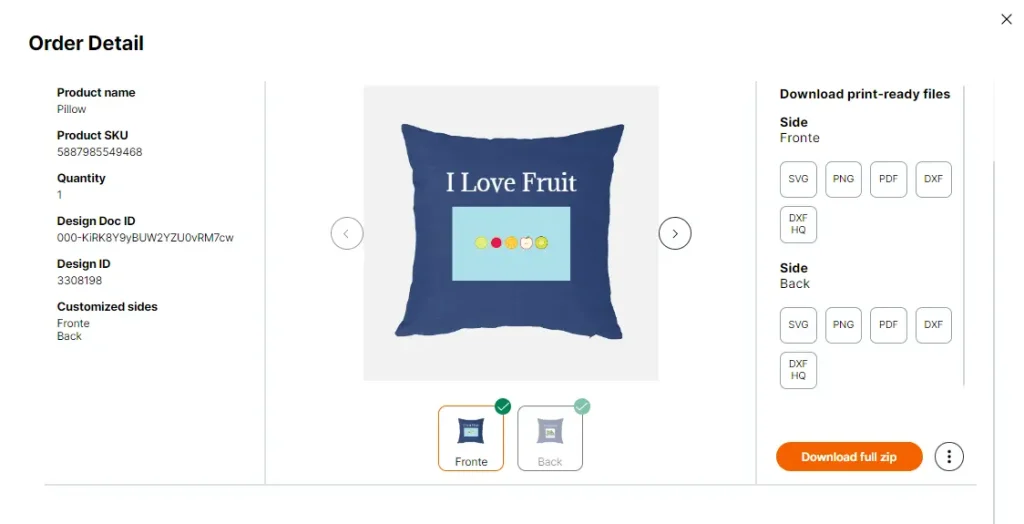
Customize your print-ready files:
You can create your own printing method and set your own rules to name the print-ready files. Also, you have the flexibility to provide an order summary along with print-ready files. For each order, you see several important pieces of information and a preview of the designs, as shown in the image below.
Color restrictions:
You can activate the color restrictions switch to define how colors are managed during personalization. Also, you can restrict the number of colors a customer can use in their design, ensuring consistency and avoiding production issues.
Text tool & fonts:
Within Zakeke’s printing method, you can enable or disable the text tool and restrict its functionality.
Images & clipart gallery:
You can control whether the images and clipart gallery tool is available to customers for the products or not within Zakeke’s printing method.
Teeinblue Flexible Print Area Features
While Teeinblue supports multiple print areas and variant-specific print zones, the app focuses more on POD workflows rather than custom print-shop setups. Merchants can define custom printable zones on products, with options to create unique print areas for different product variants.
Key features of Teeinblue’s print area control are as follows:
Pixel-based print area sizing:
Teeinblue’s available print area sizing is pixels (px), not available in inches/cm. So, you need to convert inches or mm to pixels using your target DPI.
Auto-import & provider alignment:
With this app, you can automatically import available print areas and sizes from the provider.
Creating & defining print areas:
Process 1: Manual creation
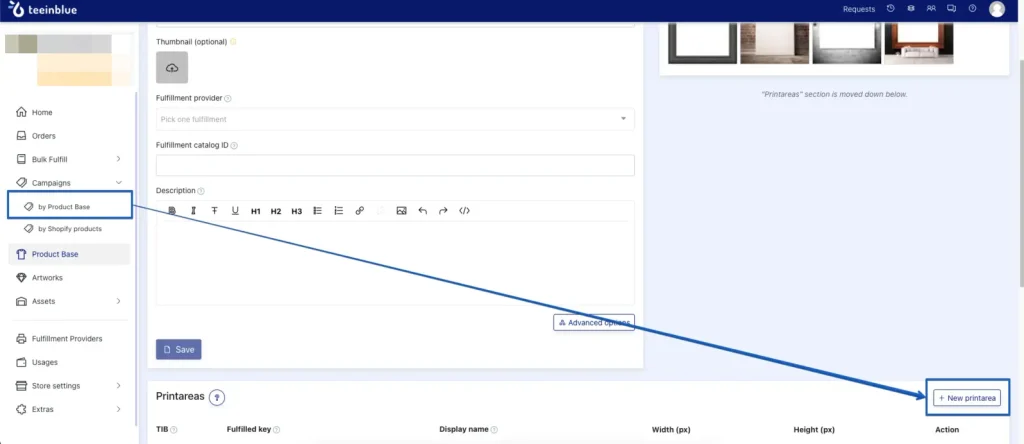
You can manually define the print area by entering a Print area key name, like front and back. Also, you can add width and height (in pixels).
Process 2: Variant-specific areas

Variants are product options with SKU, color, size, and price of the product. Teeinblue supports two options: color and size. When you set your product variants, this will be shown on the live store for your customers to choose.
Process 3: Naming conventions
The print area name is used to identify the location, and some providers require exact names like “Front” or “Back” for correct placement.
[Note: In Teeinblue, you’ll experience two parts/panels: “Front” or “Back”]
Process 4: Custom variant print areas
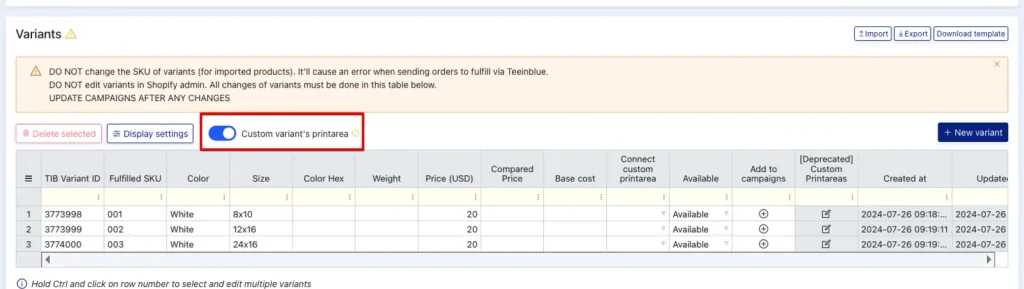
Some products might require different print area sizes for each variant. For example:
- Poster/Canvas can have various variants, including 10x10in, 12x18in, 30x20in… Each of these variants needs a different width and height of the print area.
- Mug can have some variants: 11oz, 15oz… The mug, 15oz, can have a higher number in the print area’s height compared to the 11oz.
For more details, check out Teeinblue’s Custom Variants’ Printarea
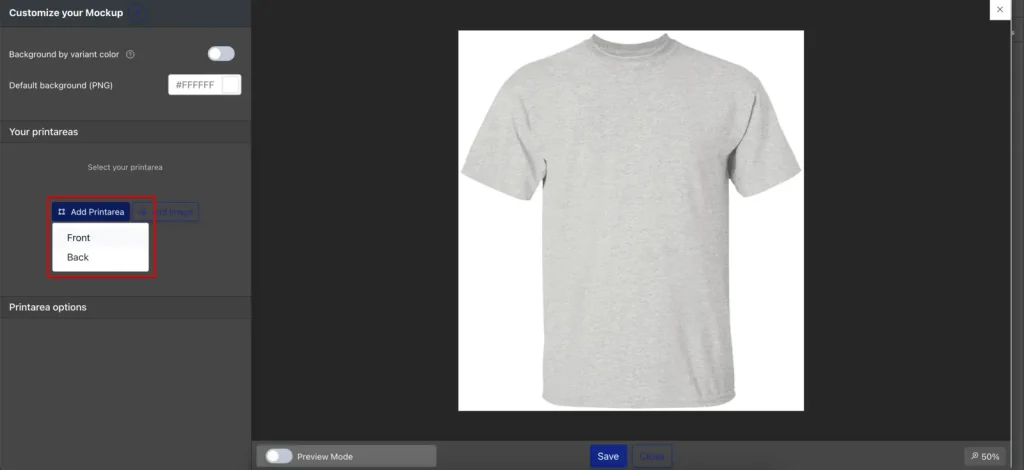
Editing & customization print area:
- Mockup editor: Though there is no Design Editor in Teeinblue, with the Mockup Editor, you can control the print area (i.e., repositioning, resizing, and changing the shape).
- Perspective editing: Adjust Teeinblue’s print area’s perspective to fit different angles and shapes of mockups. Check out the Mockup of Product Base for more details.
- Masking: Use the “Enable masked” feature with an added image to create a custom shape for the print area, useful for specific products like mugs or photos.
DPI guidance & warnings:
Teeinblue provides clear documentation on how resolution affects print quality. Go through the guide to avoid using the wrong DPI when converting inches to pixels.
You’ve all the details about these three product customization apps: print area control. Let’s check out the key pros and cons that ease your selection process.
Why choose InkyBay: Pros & Cons
Let’s take a closer look at InkyBay’s custom print area control pros & cons from the table below:
| Pros | Cons |
| 1. Integrated Design Studio (Design Lab) 2. Support multi-panel/multi-part print areas 3. Custom-shaped print areas (rectangular, star, circular, polygonal, etc.) 4. Print area visibility controls based on selected product options 5. Real-time previews within the print areas 6. High-resolution print-ready files & printing methods 7. Flexible print area size & dimension control 8. Dynamic pricing based on printing type, setup fees, number of colors, and other factors. | 1. No direct POD provider collaboration 2. Multi-panel & multiple printing type options are available in the Advance Plan |
In short, InkyBay’s print area control is the best fit for e-commerce store owners and print shop businesses who need flexible, hassle-free, precise, and scalable product customization options.
- Merchants selling custom or complex products that require multiple print areas.
- Merchants who focus on print quality.
- Merchants who want full print area control over print areas.
- Merchants who value customer experience & quality print files.
Why choose Zakeke: Pros & Cons

Merchants choose Zakeke for its robust 3D and AR product personalization capabilities. Here are the pros and cons of Zakeke’s print area control:
| Pros | Cons |
| 1. High-resolution, print-ready files 2. Realistic previews 3. Support large printing files 4. Variant-specific print areas 5. Real-world dimension control 6. Custom print areas | 1. No dynamic pricing flexibility on printing type, printing colors, etc. 2. Support only two parts/panels (back & front) 3. No integrated Design Studio |
In short, Zakeke is a popular choice for POD businesses to generate automatic production-ready files.
- If a merchant just needs a simple front/back print zone for a standard T-shirt and wants minimal setup.
- If a merchant requires simple print area control without custom pricing flexibility.
- If production workflow integration is important, then Zakeke delivers the best results.
Why choose Teeinblue: Pros & Cons
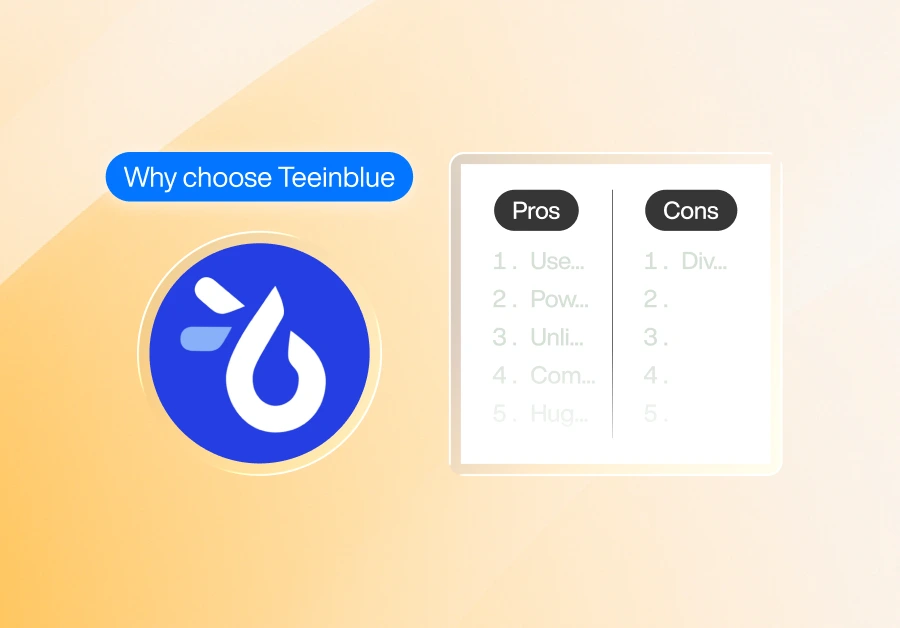
Here’s a detailed pros and cons chart based on Teeinblue’s print area control features:
| Pros | Cons |
| 1. Live, real-time previews of design 2. Support variant-specific print areas 3. Support only two print panels (front & back) 4. Generate print-ready files automatically 5. Easy to adjust the size and position of design elements 6. Integration with POD providers | 1. No custom printing pricing available 2. No integrated Design Studio 3. Dependency on updates |
In essence, Teeinblue is the best option for merchants with POD-based businesses who require simple print area control.
- If merchants want to define exact pixel-based print area sizes that align with their fulfillment provider specs.
- If the merchant wants variant-specific print area support and a mockup.
- If a merchant wants integration with their Shopify store and direct POD provider workflows.
Now the choice is yours. Go through the pros and cons of three different product customization apps and choose one that suits your business perfectly.
Final Verdict
That’s a wrap on our comparison of InkyBay vs Zakeke vs Teeinblue: Who Offers the Best Custom Print Area Control.
If you’re looking for an easy way with advanced print area features with minimal hassle, InkyBay is a great choice to start with. But you can explore these three apps before sticking with one.
Did we miss anything important? Let us know! We’d love to hear your thoughts on your eCommerce journey & which app helps you to fulfill your orders and deliver them successfully!!
FAQ: Custom Print Area Control For Product Customization
What is the print area, and how do I define it on my products?
In a product customizer app, the print area refers to the boundaries for where a design can be placed. InkyBay allows you to define print areas for individual products through custom shape print area options.
Can customers see a live preview of their design within the print area?
Yes, of course. With InkyBay, customers can see a live preview of their design within the print area. Also, store owners get the flexibility to change the print area size and set a price per printing method.
What does print area flexibility mean in the Shopify product customizer app?
Print area flexibility refers to how precisely you can define, edit, and control the printable zones of your product
Which app gives the most control over custom-shaped print areas?
InkyBay is the perfect app that allows merchants to define custom-shaped print areas, including circular, rectangular, star, polygonal, or any other shape.
Which app gives merchants the most control over print area pricing?
InkyBay is the best product customizer app that gives merchants the most control over print area pricing. For more details, check out InkyBay’s printing types and customization pricing guide.