Customization pricing is generated based on the printing types you selected for the product. Inkybay has multiple ways to set up customization pricing under the printing type.
To manage printing types, colors, and pricing, navigate to “Products >> Printing Types & Pricing” or you can manage printing type on the same page while you are adding/editing your customized products.
Note: If you do not want any extra price for customization over your base product price (from Shopify), just make all the prices as zero (“0”) under the selected printing type for the products. And all the customization prices in our app will be added (additional) over your base product price.
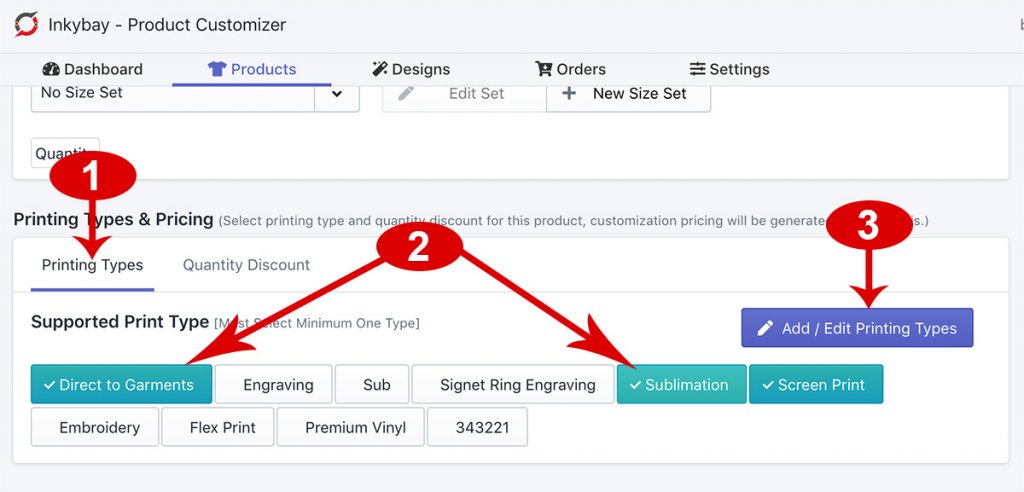
- Available printing types
- Selected printing type for the product. You can select/unselect available printing types for the current product.
- Add new printing type or edit existing printing types to set up available imprint colors or customization pricing. See below for printing type options.
Basic pricing
Under basic pricing, you can set up a setup fee for the entire design, the initial price for text and graphics, name and number pricing and per square inch price for added designs. See the below details with numbers.
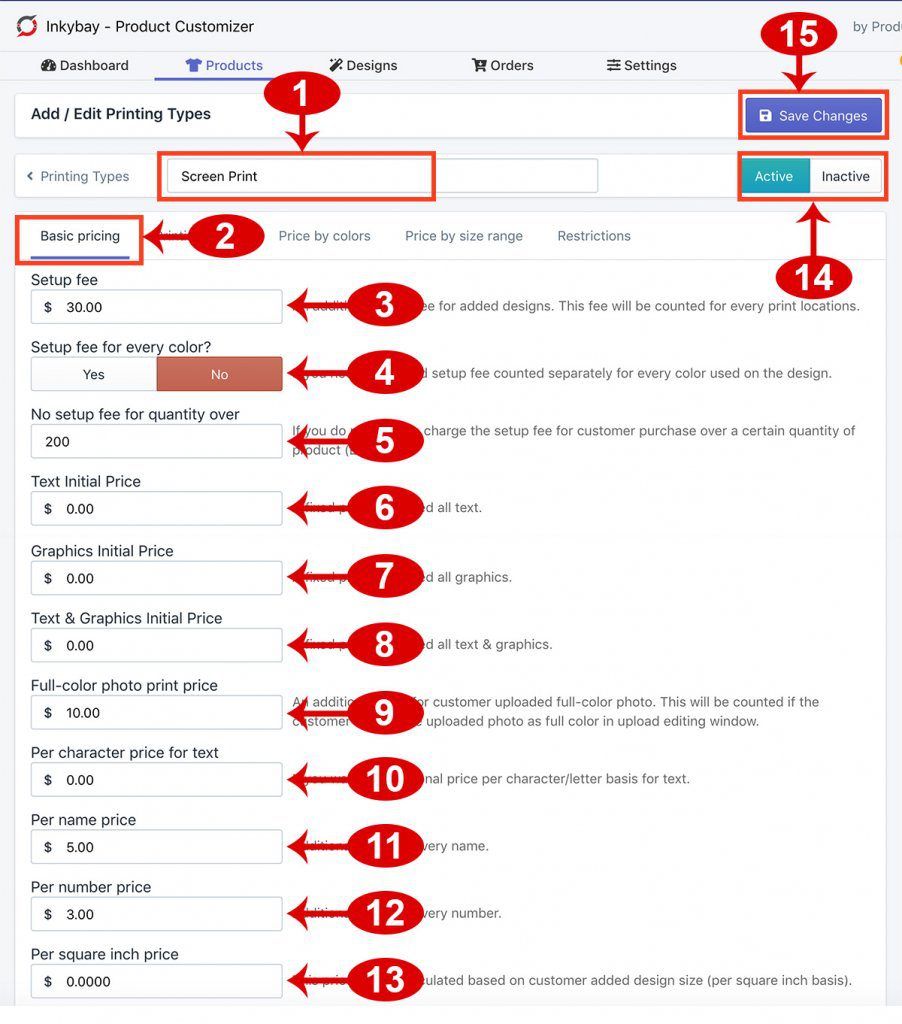
- The name of the printing type will display on the front end design tool while the customer selects the printing type.
- Click to see the basic pricing setup.
- Setup fee: Set this price if you want a one-time setup fee per print location (for any product quantity). This will be counted only if customers add any design on a print location (Ex: Front/Back). This fee will be counted one-time for every print locations (where customers add any design), like if your product contains 4 sides FRONT, BACK, LEFT, RIGHT, System will calculate this fee 4 times if customer’s add design on all 4 sides/print location. If the customer adds a design on 1 side, the system will calculate this price only once.
- Setup fee for every color?: Set yes, only if you want the setup fee (in number 3) to be counted separately for every color used on the customer’s added designs/text.
Ex: In the front-end user created a design and the design contains a total of 5 colors if you set yes, the system will calculate this setup fee 5 times (total number of design colors is 5). If you want to charge setup fee only once for total design (in one print location), just set No. - No setup fee for quantity over, If you do not want to charge the setup fee (in number 3) for the customer’s purchase over a certain quantity of the product (Ex: 200).
- Text Initial Price: Add this price, if you want a fixed price for all added text per print location.
- Graphics Initial Price: Add this price, if you want a fixed price for all added graphics (from gallery or the customer uploads) per print location.
- Text & Graphics Initial Price: If you want a combined discounted price for added text and graphics, add this price. This will counted only when customers add both text and graphics.
- Full-color photo print price: An additional price for the customer’s added full-color photos. This will be counted if the customer selects the uploaded photo as full color in the upload editing window.
- Per character price for text: Add this price if you want an additional price per character/letter basis for the customer added text.
- Per name price: An additional price for customers added every name (with names and number features).
- Per number price: An additional price for customers added every number (with names and number features).
- Per square inch price: This price will be calculated based on customer added design size (per square inch basis).
- Active/Inactive the current printing type
- Save the printing type after making any changes to see the effect on the front end.
Printing colors
Here you will set up your available imprint colors for customer added text and graphics. You can manage your available printing colors based on the printing type. Take a look at below image and details based on the numbers:
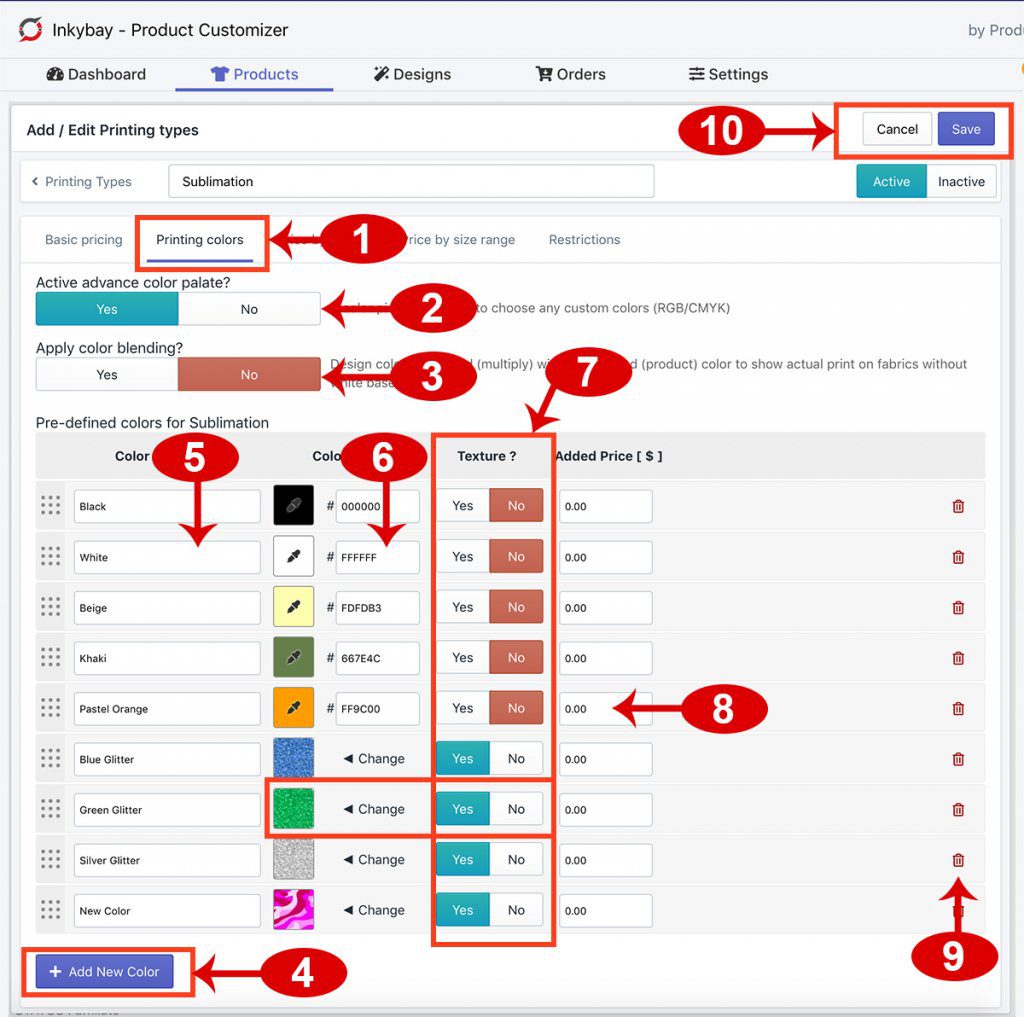
- Click to set up available printing colors for the currently selected printing type.
- The advanced color palate? Set yes, if you want to allow customers to choose any custom colors (unlimited printing colors) for their added designs. If you set yet, it will add a button “Advance color” to choose colors from a color palette or enter custom color codes.
- Apply color blending? Design colors will blend (multiply) with background (product) color to show an actual print on fabrics without a white base.
- Add new printing colors
- Color Name: Enter the color name, you can put any name as you want. Ex: “White”.
- Color Value: Enter the 6 digits hexadecimal color code/value, do not enter #.
- Texture? (available for advance and professional plan only): If you want to add texture (glitters) as printing colors, set yes. You will get the texture upload option on the left on the color icon. Click on the color icon to upload your texture/glitter.
Size recommendation for glitter/texture, use up to 200x200px jpg/png image. - Added Price: If you have any extra price for this printing color, add here.
- Click on the trash icon to remove the colors.
- Save the printing type after making any changes to see the effect on the front end.
*** To re-arrange the colors, click and drag the colors with the dotted icon on the left side.
Price by colors
Here you can set up customization pricing based on the number of print colors used for the customer added designs. You can combine the pricing based number of print colors and the number of product quantity. Can set discounted customization pricing based on the number of products and number of colors.
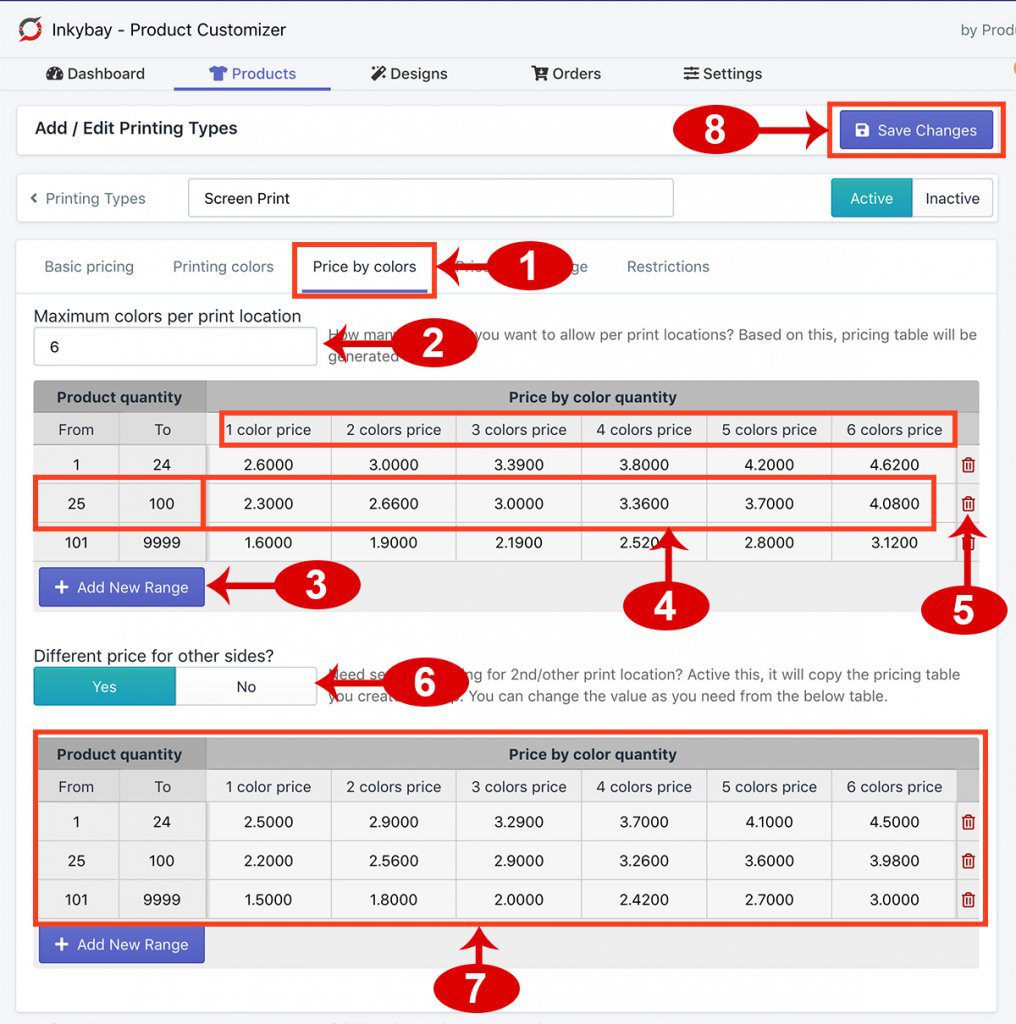
- Click to set up customization price by the number of print colors.
- Enter the maximum allowed print colors per print location. Based on this number, a pricing table will be generated below (as shown in number 4). Customers will be allowed (maximum) to add print/design colors based on this. For example 4, 6, 8 or 10 colors per print location.
- Click to add the product quantity range.
- Based on the product quantity range, you can set up the pricing for the number of colors used in the design under the generated table.
For example, product quantity [25-100], 1 color print price $2.3, 2 color print price $2.66, 5 color print price $3.7.
product quantity [101-9999], 1 color print price $1.6, 2 color print price $1.9, 5 color print price $2.8. - To remove a row, just click the trash icon.
- Different price for other sides?
If you want to set up separate pricing for 2nd/other print locations. Active this, it will copy the pricing table you created on top. You can change the value as you need from the below table. If you do not set this, the first pricing table will work for all sides/print locations. - Set up the pricing for 2nd/other print locations.
- Save the printing type after making any changes to see the effect on the front end.
Price by size range
Set up customization pricing based on customer’s added design total size range, product quantity range and product color type (light and dark).
Example: Product quantity [1-50], print size 8×11″ price $5.00 (for light color t-shirt) and $7.00 (for dark color t-shirt). Print size 10.5×15″ price $8.00 (for light color t-shirt) and $10.00 (for dark color t-shirt).
Product quantity [51-250], print size 8×11″ price $4.00 (for light color t-shirt) and $6.00 (for dark color t-shirt). Print size 10.5×15″ price $7.00 (for light color t-shirt) and $9.00 (for dark color t-shirt).
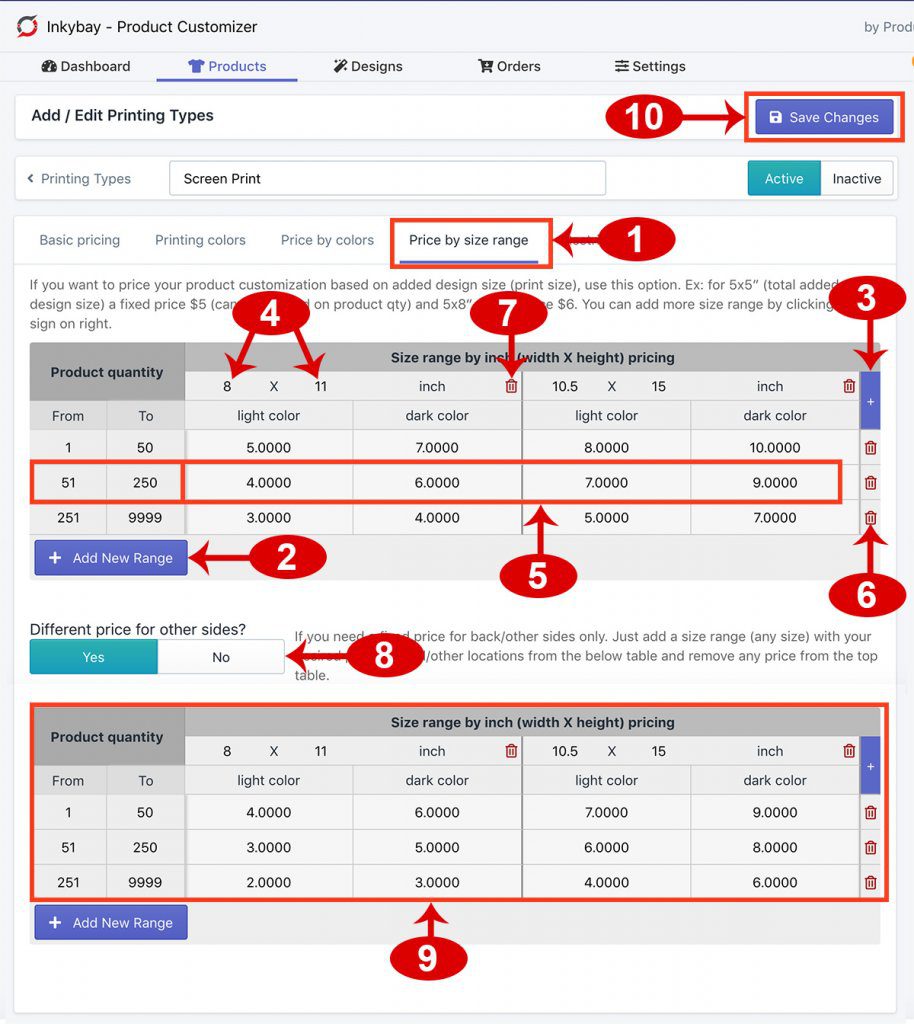
- Click to set up customization price by added design total size.
- Click to add the product quantity range.
- Click the plus sign to add a new size range for pricing.
- Click to add/edit the sizes in INCH (Width x Height). Ex: 5×5 inch or 8×10 inch.
- Enter the total customization charge for the given size range. You can enter a separate price for light color products and dark color products (light and dark color for the product can be marked from the product color settings).
- To remove the product quantity range.
- To remove the added size range.
- Different prices for other sides?
If you want to set up separate pricing for 2nd/other print locations. Active this, it will copy the pricing table you created on top. You can change the value as you need from the below table. If you do not set this, the first pricing table will work for all sides/print locations. - Set up the pricing for 2nd/other print locations.
- Save the printing type after making any changes to see the effect on the front end.
Restrictions
Set the minimum product quantity based on printing type and auto image filter (available for advance and professional plan only) to make uploaded raster images to a single color.
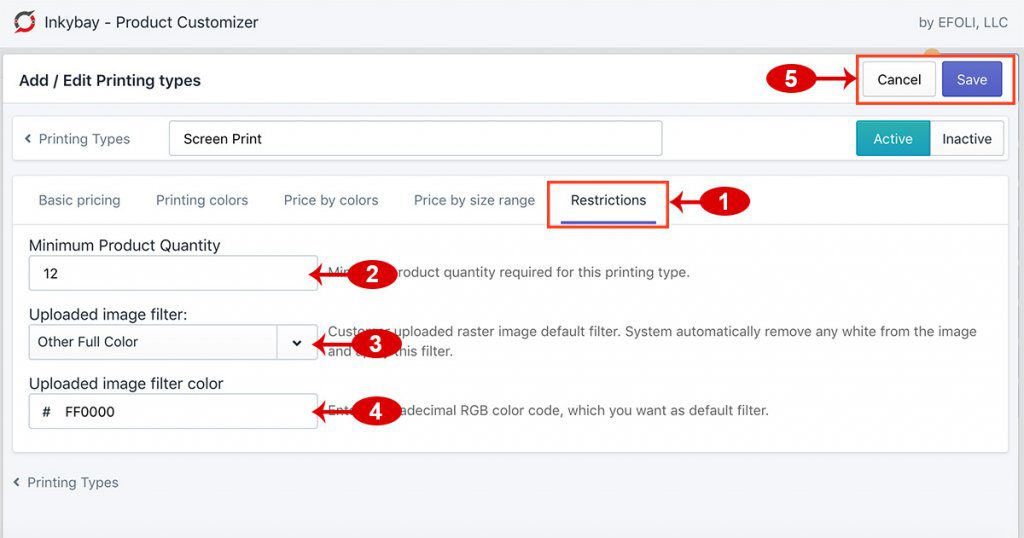
- Click to set order quantity and auto raster image filter
- Minimum Product Quantity: If you have a minimum order quantity for a printing type or product, enter the minimum product quantity here.
Ex: for screen print you want a minimum of 12 items/product to proceed with the order, you can enter 12 here for screen print. And for DTG (Direct to Garment) you may allow only 1 quantity to proceed with the order. From the design tool when a customer tries to add to the cart, the system will check this quantity. The quantity may contain multiple sizes. - Uploaded image filter (available for advance and professional plan only): If you want the customer uploaded raster images to apply a default color filter, you can select from the drop-down. For example: if you do engraving or your printing method support only 1 color print, you can apply this color filter (even with custom color code in number 4). The system automatically removes any white from the image and apply this color filter.
- If you want a fixed color code to colorize the uploaded image, select the “Other Full Color” option from the drop-down (in number 3) and this input field will appear. Enter the 6 digit HEX color code (without #), the system will automatically apply this color filter while upload any raster image by selecting this printing type.
- Save the printing type after making any changes to see the effect on the front end.
Still, if you face any further issues or need help, feel free to contact us. Our support team will be happy to help you.
You can always reach us via
- Support ticket from Inkybay app
- Live Chat in Inkybay app
- Direct email to support@productsdesigner.com
So, Good Luck! And happy selling with Inkybay.