InkyBay comes with extended product options including unlimited conditional options to sell configurable products with additional option price/upcharge. If you use Inkybay, you do not need to use another 3rd party app for product options in your store, including option image preview as a product image.
You can offer any additional product options for your personalized products which customer can choose from the product page before goes to personalize the product using inkybay product customization tool.
You can add an unlimited number of product options set with unlimited combinations in your store product pages, including file uploads (as attach), dropdowns, text inputs, radio buttons, swatch, and checkbox options to provide the options you need to sell your products.
Let’s go through product option set up
To get started with product options, navigate to “Products >> Product Options”.
Here is a help video for how to configure product options (long video)
- Navigate to “Products >> Product Options”
- Add a new option set. You can add an unlimited option set based on your needs. See below for the next steps and details.
- Edit existing option set to add/remove options to this.
- Duplicate an existing option set including all of its options/sub-options and any images available to this option set.
- Remove the options set. This will remove all of its options/sub-options and any images available to this option set.
2. Adding options to option set and apply to products
You can add different types of unlimited options to an option set. You can click add/edit option set, you will see below the screen to manage your options.
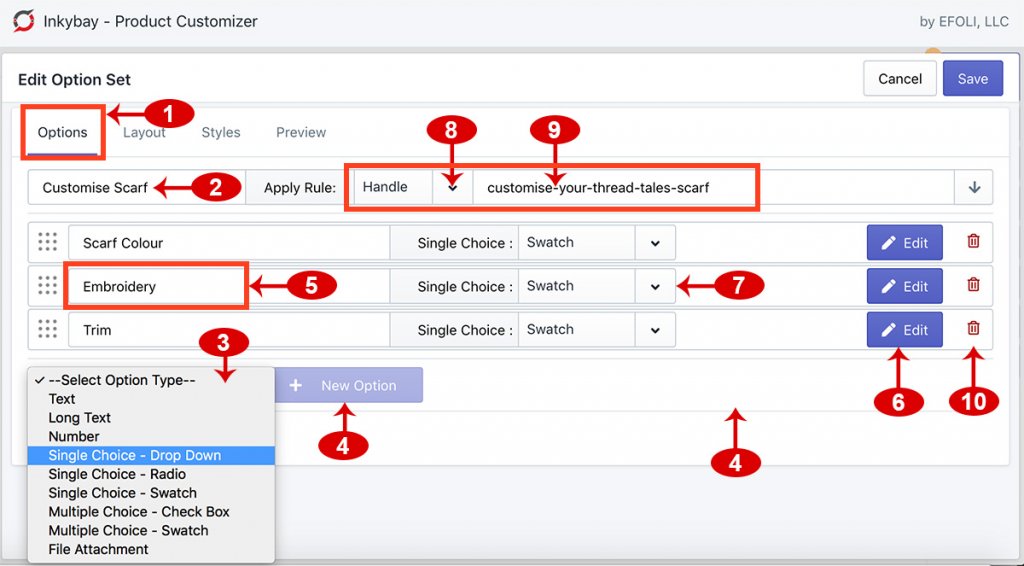
- Select options
- New Option Set (Name): Name of the options set. Normally this will show on the front end, if you do not want to show the option set name, you can hide it under the Style tab by adding custom CSS.
- Select Option Type: We have multiple types to select from. After selecting the option type, add a new option button will be active (number 4). Also, based on option type selection, you will get different settings on the next screen (number 6).
- Text: It will allow customers to put Text and send it with the order. Here, you will find an option to set a number of character restrictions limiting text character insertion.
- Long Text: It will allow customers to put Long Text and send it with the order, having a large number of character insertion ability
- Number: It will allow customers to put Numbers and send them with the order.
- Single Choice – Drop Down: You can offer options and make a list of that through this type. Then the customers will be allowed to choose one option by clicking and selecting from the dropdown list.
- Single Choice – Radio: It will allow you to offer options, where customers can only choose one by clicking on the radio button.
- Single Choice – Swatch: Customers can choose an option from the available swatch. For instance, customers can choose a color for the product.
- Multiple Choice – Check Box: It will allow customers to choose multiple features by clicking on multiple checkboxes. It best suits for products on which you want to enable customers to choose multiple sizes.
- Multiple Choice – Swatch: It will allow customers to choose multiple features by clicking on multiple swatches. For instance, customers can choose multiple colors for a single product.
- File Attachment: This will enable customers to attach a file with the order. This option supports a large number of file formats.
- Click the new option to add the option.
- Enter the name of the option.
- Click Edit to add attributes to the option and get relevant settings (based on option type) on the next screen.
- Showing the selected option type, you can change the option type from here also.
- Apply Rule: Apply the option set to products (custom or regular store products) with “Apply rule”. You can apply the option set to products in multiple ways. Select a rule from the drop-down. By default it will be selected No rule, this means this option set is not yet applied to any products. You can selectively apply the rule from:
- Type: Apply this option set by using product type from your Shopify products.
- Vendor: Apply this option set by using product vendor from your Shopify products.
- Tag: Apply this option set by using a product tag from your Shopify products.
- Handle: Apply this option set to a single product by using the product handle/URL.
- Select/type the based on your selection on number 8.
- Remove the option, including all of its attributes and conditional child options (if any).
3. Adding attributes to the option set
After providing the option name, applying the rule and selecting option type, click on the +New Option (in the previous step). This window will appear
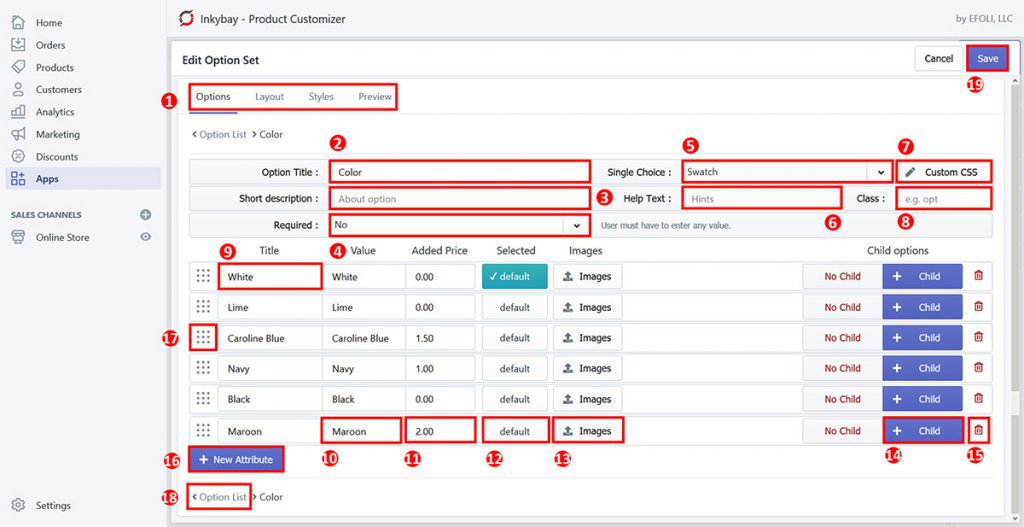
- Navigation: You can click here to go to different settings for the option. You will find:
- Options: Here you can add/manage all your options, attributes, images for option preview or conditional child options.
- Layout: HTML layout, you can change the option set display layout layout
- Style: Here you will find CSS codes to customize the option preview in the front end, swatch size, color, adding a border, position or anything related to match with the theme style.
- Preview: It will show how the option would look.Select Options to configure it (by default, Options will be selected)
- Options Title: Provide a title for the option
- Short Description: Provide a short description of the option. It will let your customers know about the option.
- Required: If you want this option to be required for the order, select Yes, otherwise select No. By default, No will be selected.
- Single Choice: If you want to change the previously selected Option Type for this option, you can do it from here by clicking and selecting from the dropdown list.
- Help Text: You can add option hints from here. If you add any text here, it will add a help icon with the current option.
- Custom CSS: If you want to add custom CSS for this option, click here to add.
- Class: Mention the class/ID here if you want to match with ur store theme.
- Title: Provide the options attribute name here.
- Value: You can provide value for the attribute here. This value will be shown in and with the order as a selected option.
- Added Price: If you want to charge extra for the attribute, put the added price here. This price will be added over your base product price.
- Default: Click here to make the attribute as default. It will be shown as the default attribute on the product page
- Image: Click and upload an image for the attribute. You will be asked to upload an image for the icon, and the attribute itself. For the swatch, you can upload a 100×100 px image; and when the customer clicks on the swatch, the product image will be shown in the preview.
- + Child: If you want to add any conditional option for the attribute, click here. It will create a sup-option for that particular attribute. Then you need to add details on it just like a new option (processes are the same).
- Delete: Click on the red trash icon to remove the options attribute, including all of its conditional chile options (if any)
- + New Attribute: Click here to add another attribute
- Reorder: Click and drag this dotted icon to arrange attributes.
- Options List: CLick here to go back to the options list.
- Save: Click on save to save the option.
Additional details:
You can now add another option under the same option set. For this, click on the Options List to go back in the preview screen.

(If you want to add additional option to already created option set, then go to Product Options, then find the options set and click on the Pen Icon. see the example image below).
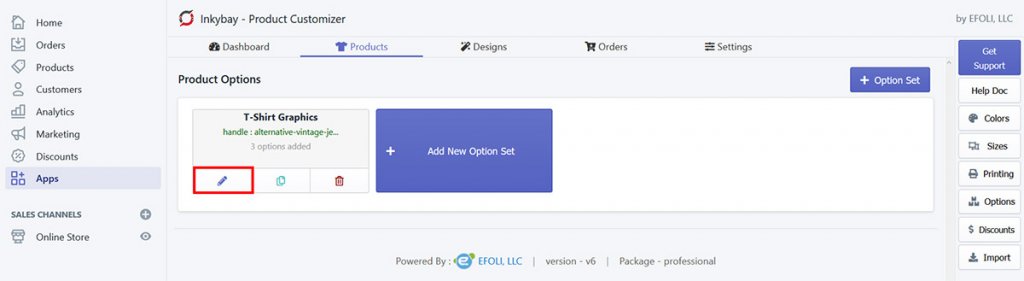
Now, go and Select Option Type and provide a type, then click on the + New Option

Still, if you face any further issues or need help, feel free to contact us. Our support team will be happy to help you.
You can always reach us via
- Support ticket from Inkybay app
- Live Chat in Inkybay app
- Direct email to support@productsdesigner.com
So, Good Luck! And happy selling with Inkybay.