Inkybay – Product customizer introduces inventory management for your customized products. Now, you can track your products, restrict customers from placing orders when products are stocked out. Not only that, but you can also choose to stop selling when you have a specific amount of product in your stock.
*** If you are on Inkybay advance, professional or unlimited plan, now you will see the new feature called “Inventory” under restrictions, while you are editing the products in the Inkybay admin.
Under the Inventory tab, you will see all your available variations for the product based on your configured size, colors, and styles. You can filter data to display minimal by Size, Style, and Colors.
To enable inventory checking, you need to check the track and add the available quantity for variations and save.
Where to go to configure inventory?
The inventory management system is for custom products. So to find out the inventory options,
- From your Shopify adding panel, navigate to Apps
- Go to Inkybay admin
- Click on Edit from your preferred product
- Scroll down to the end and select Inventory
Once you are in the inventory, you will see a similar screen:
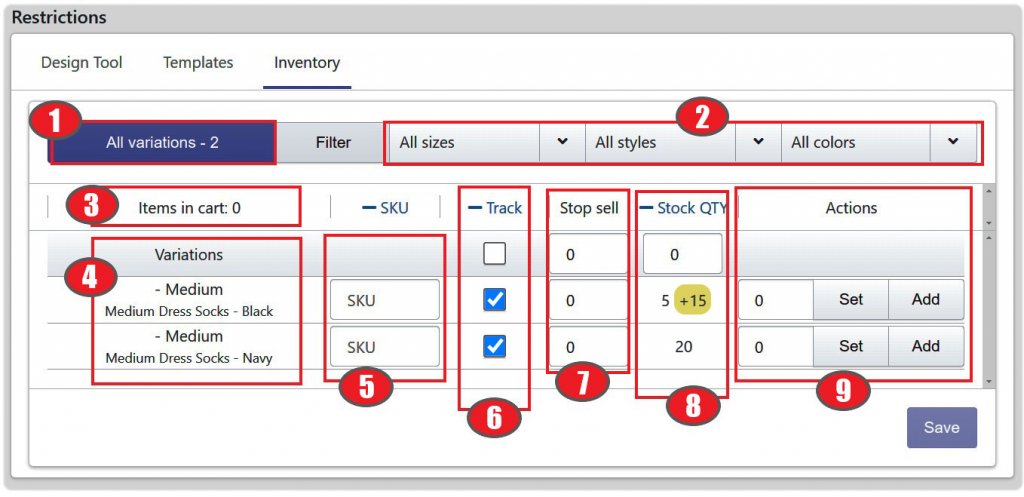
Details with numbers shown on the image:
- Variation Count: The number of the total variations for this product is displayed here. The variations are coming from the sizes, product colors, and product styles you set for this product. For this example, the total number of variations created is 2.
- Search variants using Filter: The Filters are very helpful when you have a large number of variations. You can search for the variant you are looking for using the filters. You can filter data to display minimal by Size, Style, and Colors.
- Items in cart: It will display the number of products that are still in the cart added by the customer. If the product remains in the cart for more than 24hrs, then it will be removed and the inventory count will be updated accordingly.
- Variant listing: All the individual variants can be found here. The variant title follows this sequence “Size name – Style name -Color me”. For the first variant example shown in the above image, Medium is the size, Medium Dress Socks is the style name, And black is the color name. On the right side of the same row, you will see the SKU, track option, stop sale, and available quantity of this variant.
- SKU: Each variant comes with an SKU field where you can use custom SKUs. You can see the SKU in the order details in inkybay admin and also in the downloaded order output file.
However, if the SKU field remains blank then inkybay would look for the SKU in your Shopify store for that product. You will see the first SKU set in Shopify for that product in the order output file. - Track: This is the field where you can decide whether you want to track the quantity or not. If you track the quantity then it will show the available quantity of the variants on the product page. When the quantity of a product is 0 then it will show “out-of-stock” for the product on the front end.
You can either track quantity of individual variants or track all the available variants for those products. To track all the variants, click on the top check-box and then a button will appear to select all variants. - Stop sell: This section is helpful when you want to stop selling even before the stock is over. Depending on the value you enter here, the app will stop selling the variant when that much quantity is left in stock.
You can set different stop sell quantities for different variants, or apply the same stop sell value for all variants. To set a stop sell value for all the variants, click on the top number field, enter the value. And then click outside of the field, a “Set All” button will appear. Simply click on that and it’s done. - Stock Qty: This column shows the available quantity of each variant. It also displays the quantity of the variant added to the cart. Quantity added to the cart is highlighted in yellow color.
If you look at the example image, you will see one of the values is highlighted in yellow color. It is because out of the total of 20 products of that variant, 15 are added to the cart and 5 are left in the stock. If the order is not placed within the next 24 hrs then the quantity will become 20 again.

Apart from showing the available quantity, you can add new quantity values for all at once. To add the quantity for all the variants, enter the value in the top number field and then click on the outside of the number field. A “Set All” button will appear. Click on the button and the quantity will change for all the variants. - Action: This field is to help you when you want to set a different quantity for different variants or change the quantity of a variant.
- Set: Enter the available quantity of the variant and click on set. It will replace the existing quantity value that you see on the left “stock Qty” column.
- Add: If you have new stock of the product and you want to add the stock with an already available quantity, then this is the place to do that. Simply enter the value of new stock and click on add.
Not using Inkybay yet? Get it from the Shopify app store: