Managing colors for custom products in InkyBay.
You can manage product colors in two way:
Manage colors separately under “Products >> Product Colors” or,
While creating custom products, scroll down to Product Colors. You will find:
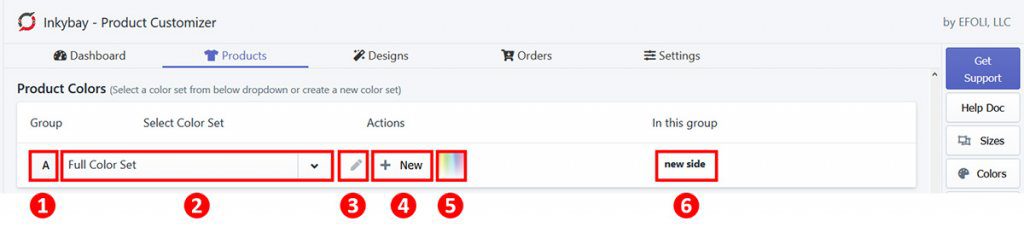
- Group Name: This is the group name where the currently selected color-set belongs (can be changed on Product Setup).
- Color set name and selection: Selected color set’s name shows here, click on the dropdown icon to select the preferable color set from the available list. This list gets updated as you create new color sets. Initially, you will find these in the list:
- No color set: If they don’t want to allow any additional colors for the product or for a specific part/panel, select this.
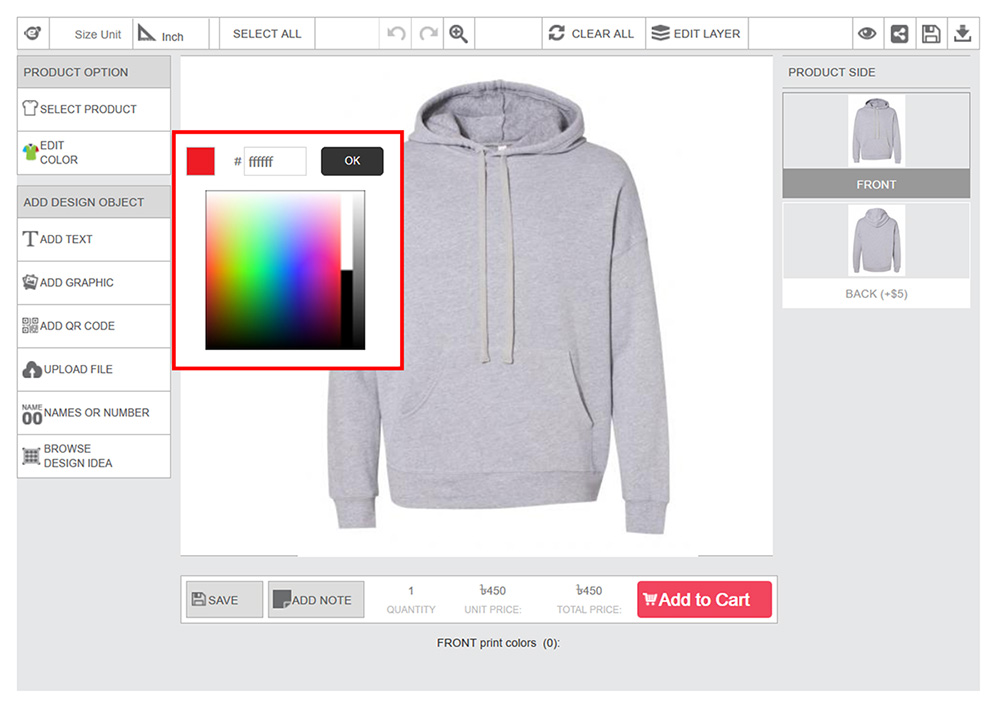
- Full/All Colors: Select this to show a color palette and allow the customer to choose any custom colors as they want. See the demo image below:
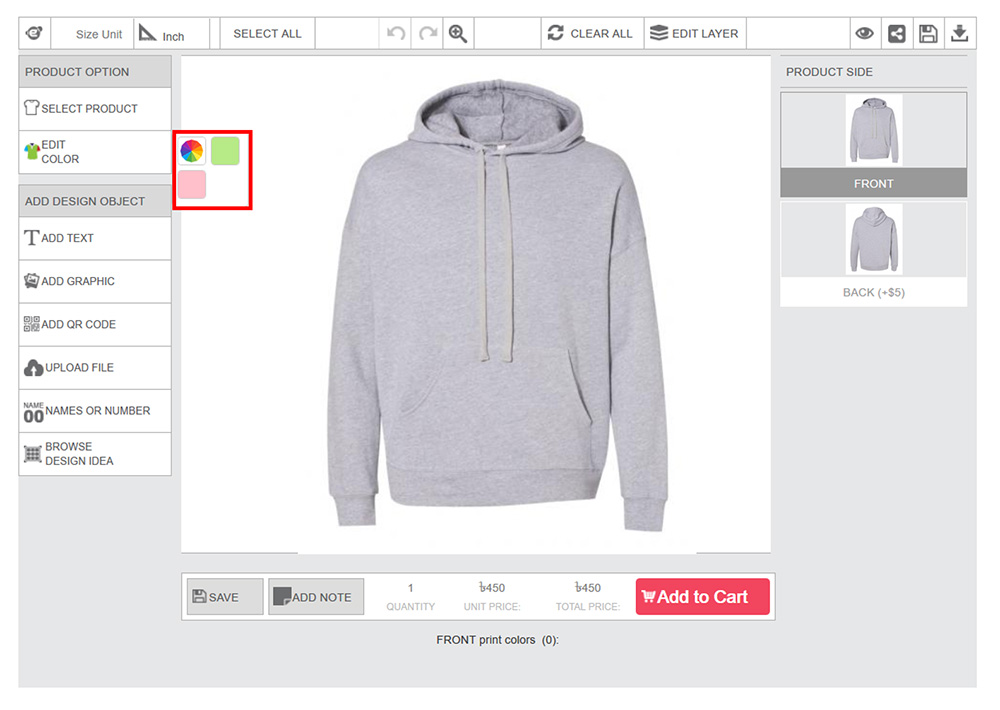
- Full/All Colors +: Select this to show a color palate with additional pre-set colors. It will show a color palette and allow the customer to choose any custom colors as they want, also additional colors will be added beside the palate. Admin can add a list of the most common colors (additional colors) to choose from. See the demo image below:
- Edit: Click on the Pen Icon to edit/modify the currently selected color set
- + New: Click here to create a new color set. It will be automatically selected as the current color set
- Default Color: The default color (that will be shown as the first color in the designer window as product color) of the selected color set shows here. Click here to change the default color.
- Linked Group: It shows the side of the product that is linked with the selected color set.
Let’s show you how to create a color set from scratch. Click on the + New
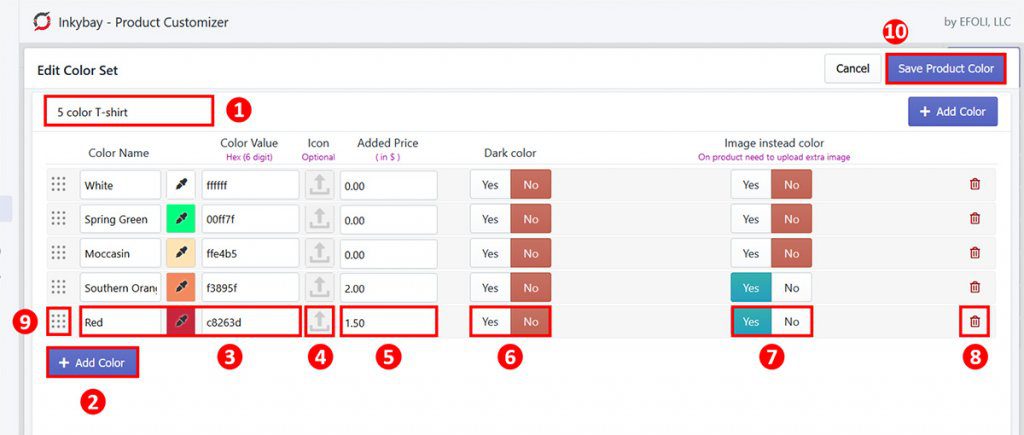
- Name: Provide a name for the color set.
- + Add Color: Click here to add a new color. By default, white will be created automatically. You can change it easily
- Color: Here you can select a particular color in two ways:
- Name: Provide a color name as you need. You can put any name as you want. For instance Green. Also, you can name a two-tone product color like Black/White.
- Color Picker: Click on the dropper icon to open a large color palette. You can now select any available color from the palette. The name of the color and hex code (color value) will be automatically picked as you select the color, and the color picker icon will change its color according to the hex code.
- Color Value: It is the hex code of the selected color. Enter the hexadecimal color value (6 digits for one color), do not enter #. If you want to show multiple colors in a single icon, you can enter multiple color values as well with an underscore (_). Ex: “000000_ffffff” for the “Black and White” color icon. It will automatically generate the two-tone color icon.
If you have a hex code of a color that does not available in the color palette, or if you have a picture of your product, simply put the hex code that you have (in this case, you can get the hex code easily, here is a video link on how to get color code from Photoshop. If you don’t have access to Photoshop, here is another video of an alternative way to get color hex code). For both cases, you need to put the color name manually as the color is not available in the palette).
- Icon: If you want to show a particular product image as a color icon, click here and upload the image. Instead of showing the color, that image will be shown as an icon. Note that you need to upload in jpg format as 40×40 px.
- Added Price: If you want to charge extra for a particular color of the product, put here your required price. This will be added (extra) over your base product price.
- Dark Color: If you want to define a color like dark, click on Yes, if not then click on No (by default, No will be selected). You can set customized pricing based on light and dark product colors later on in the Printing Type section.
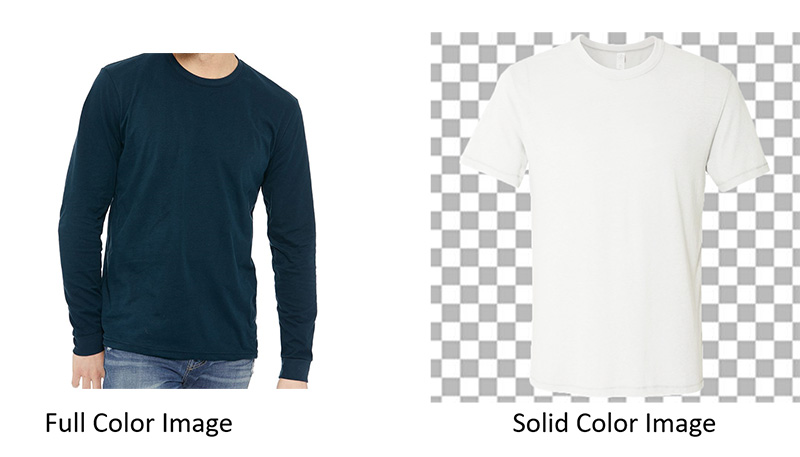
- Image Instead Color: If you have a full-color image of the particular product and want to show that in the designer (on Edit Color), select Yes. For this, you will have to import a separate image of that color in product settings. For instance, if you have a Heather color variant, this is the best way to set the color. If you don’t want to do that, select No (by default, No will be selected). For this, you will just need to upload a solid (background-less white color png format image of the product with proper shadow and lighting) image of the product in product settings. It will be named as grayscale on Side settings. Your customers can choose any given color on the designer window, and Inkybay will colorize the uploaded grayscale image with that color code (color value) and preview the product in that selected color. This method works best for solid type product colors. Here is a sample to clarify the two options:
- Delete: If you want to delete a color, click on the red trash icon
- Reorder: Click and drag the dotted icon to organize your color preference. Product Colors on the designer window will be shown based on this preference.
- Save Product Color: Click here to save the color set.
Still, if you face any further issues or need help, feel free to contact us. Our support team will be happy to help you.
You can always reach us via
- Support ticket from Inkybay app
- Live Chat in Inkybay app
- Direct email to support@productsdesigner.com
So, Good Luck! And happy selling with Inkybay.
Frequently Asked Questions (FAQ) for product colors
Q: How can I set unlimited colors with a color palette as my product colors?
A: While adding/editing the custom products in Inkybay, under “Product Colors“, select “Full / All Colors” from the color set dropdown. It will allow the customers to select any colors as product background from a color palate or input custom color codes.
Q: How to set up product colors?
A: In our app, we have 2 options for product color.
1. You can upload 1 transparent grayscale/white PNG image (per side) and add just the color code. Our app colorizes the uploaded image with the given code to show the customer selected colors. This method works best for a solid type of product color. This is a sample product with similar colors https://inkybay.myshopify.com/products/cap
Here are sample product image for your reference
2. Secondly, you can upload every product color as a separate image as you want. For this, you need to update the color set, color option. Just mark Yes for the image instead of color https://prntscr.com/nofuvf and save, you will get the option to upload separate images for every color you marked as image instead of color. To upload click advance settings https://prntscr.com/nofvum and upload https://prntscr.com/nofwlw
Sample similar product https://inkybay.myshopify.com/collections/all/products/ladies-short-sleeve-v-neck-t-shirt