Using the Custom Size-Fixed Height Option You can allow your customer to Choose any width for their product. But the height of the product will remain fixed. And if you allow that product for designlab then every time you enter the designlab with a different value of the width, The product width will change accordingly. But the Height will remain the same.
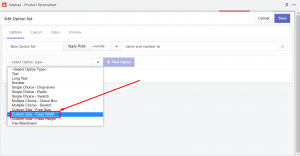
For creating an option for Custom Size -Fixed Height Option, follow the steps below:
- Navigate to the Inkybay admin panel.
- Create a new option set for your product

- Select the option for “Custom Size – Fixed Width Option” from the dropdown
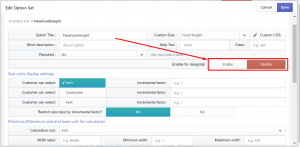
 Give a title for the option, add a short description, and select the status yes or no for the required field.
Enable for Design Lab Option:
If you want this custom size option to be enabled for the Design Lab, just turn on the Enable option and if you don’t want this option in the designlab then select “Disable”.
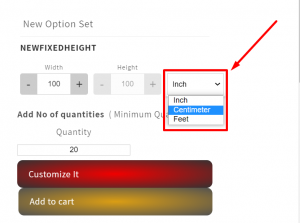
Size Unit Display Settings:
It will help your customer to choose their Size Unit in the product page. You can set up the Size Unit Display settings as Multiple Choice in the admin panel.
- Inch: This will help your customer to choose the Size Unit as Inch
- Centimeter: This will help your customer to choose the Size Unit as Centimeter
- Feet: This will help your customer to choose the Size Unit as Centimeter
The size units will be displayed in the Custom Size option in a dropdown. Your customer can choose one of the size units from the front end.
Incremental Factor :
You can allow your customer to increase/decrease the value in an incremental factor. You can set it to both round value and floating point value. The incremental value can be chosen in Inch, Centimeter, or Feet units. Also, you can easily turn on/off the incremental option. If you turn the option “Yes”, then the value will be incremented according to the assigned incremental factor.
Suppose you have set the Incremental value as 2, Then in the front end your customer can take the value as 2,4,5,6, and so on if you turn this option to “Yes”.
But if you turn the option to “No”, then the incremental value restriction will not work.

Minimum & Maximum Size & base unit for calculation:
In this section, you can set the Minimum & maximum measurements for the width of the product in three different calculation units ( inch, Centimetre, and Feet ). Also, you can set the Label of the width & height that matches your product for better understanding. There is the option to set the Minimum & maximum measurements for the Height but it will not work as the height of the product is already fixed.
- Calculation Unit: This allows you to show your customers on which scale the values of the height & width are set to the custom size box. You can set different minimum-maximum values for different units. It is helpful for both the store owner & the customer to determine the exact value they want for their product.
- Width & Height Label: In the custom field section, you will see two input fields where you can assign values to one of the fields, and the other one is fixed. With a label, you can give a clear indication to your customer to set the proper values for width.
- Minimum & Maximum Width: You can set the minimum & maximum values for the width. It helps the customers to choose sizes of any values within the store owner’s preferred range. And they can’t exceed the restriction that you’ll set

This is how it looks in the frontend

Custom Size Pricing: You can assign a price for “per square of units”. You can set the price for all three available units. Your assigned price will be calculated according to the entered custom size.

SIZE DISPLAY SETTINGS:
From here you can choose how you want to display the Preset Sizes. There are basically 3 options by which you can display your preset sizes. Radio, Swatch & Select. If you do not want to offer any preset sizes you can easily do that by hiding the option.
Now if you want to offer your customer to choose the width according to themselves you can create Custom Size. You can give a title for that size from here also.
This custom size field will only show when you enable this option. If you disable the option it will not show. You can control it from the inkybay admin panel.
Now through the Minimum Label & Maximum Label field, you can give a custom label:

These will show in front of the Minimum & Maximum width you set.